Web design Artwork by OUTLAW BY DESIGN


HAPPY HALLOWEEN
 ©Sassy n Simple
 Date Written: Aug 24, 2010
THINGS YOU NEED Paintshop or Corel Program
You will need a good working knowledge of the program.
|
ANIMATION SHOP
TUBE: Moshilove PTU get it at My Psp Tubes
License mpt5442
KIT: Rocking Ruckus FTU Frightfully Halloween HERE
FONT: Of your choice
MASK: Vix Mask282 HERE
PLUGINS: alien skin Xenoflex 2 Little puffy clouds HERE
READ BELOW BEFORE STARTING
Settings may differ slightly depending on your version.
Close original after you copy it unless I state otherwise.
Sharpen all re-sized items 1 time. RE-SIZE only one layer unless other wise stated.
Refer to my image for placement of items.
Left click and right click refers to mouse buttons.
Now you can jump in
1. Select your Tube Select your dropper tool left click/foreground color Select a color
2. Open a new transparent Image 500x500 Image Flood fill with foreground color
3. Effects/Plugins Xenoflex 2 Little puffy clouds Clouds are default setting (see image for other settings Use dropper tool to select the colors for your cloud from your tube

4. Layers palette/right click/raster 1 add a new raster layer
Select #665d4e in your foreground color
Flood fill the layer
5. Layers/new mask layer/from image (settings below)
Select the vix_mask282 in window
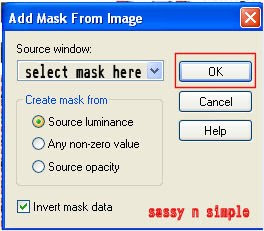
6.Layers palette/right click black/white mask
Delete
Would you like this mask merged into layer below YES
Layers palette/right click top mask/ merge/merge group
7. Effects/3D/inner bevel (settings below

8. Effects/3D/ drop shadow (settings below)

9. Select the element 7 Skull from the kit Edit/copy
Edit/paste as new layer into image
Re-size it 85%
Apply Inner bevel same settings
Apply drop shadow same settings
Move to the right side center leave room
For a border
10. Select the element 1 RIP from the kit Edit/copy
Edit/paste as new layer into image
Re-size it 70%
Apply Inner bevel same settings
Apply drop shadow same settings
Move to the left bottom side
11.Select the element 6 bat from the kit Edit/copy
Edit/paste into image
Re-size it 30%
Apply Inner bevel same settings
Apply drop shadow same settings
Move to the top center of image
12. Select the element 2 witch from the kit Edit/copy
Edit/paste as new layer into image
Re-size it 60%
Apply Inner bevel same settings
Image/free rotate right 20.00 all boxes unchecked
Apply drop shadow same settings
Move to the top right side of image
13. Select your Tube Edit/copy
Edit/paste as new layer into image
Re-size as needed. I re-sized 60%
Apply same drop shadow
Move to bottom centered
14. Select the element 9 cat from the kit Edit/copy
Edit/paste into image
Re-size it 60%
Apply Inner bevel same settings
Apply drop shadow same settings
Move to the bottom right side of image
15. Layers palette/right click on cat layer/add a new raster layer
Select black in your foreground color
Flood fill image
16. Selections/Select all
Selections/modify contract 10
Edit/clear
Apply inner bevel same settings
Apply drop shadow same settings
Go back and apply drop shadow
but change Horizontal and vertical to -2
16. Now adjust your elements to your likening
17. Re-size your image to your likening
All layers smart size
I re-sized 400x400
18. Add a new raster Layer
Apply your watermarks, copyrights and License number if any
19. Apply any text you would like to at this time.
20. In Layers palette right click group raster 2 layer/merge/merge down
Click the eye to close of this layer
Click the eye and close off raster 2 skull
Right click any open layer/merge/merge visible
You should now have 3 layers
Open all layers back up
Now you can save image in jpeg or continue to do animation
ANIMATION
Open animation shop minimize for now
1. Layers palette/right click raster 2 Skull layer duplicate 3 times
For a total of 4 layers
Click the eye and close off all but the bottom layer
2. Select Raster 2 Skulls
re-size it 60%
Move it to the left behind your tube
3. Open copy of raster 2 Skull
Re-size it 75%
Move it to the left next to other one over lapping slightly
Click eye and close off this layer
4. Open copy 2 of raster 2 Skull
Re-size it 85%
Move it to the left next to other one over lapping slightly
Click eye and close off this layer
5. Do not re-size top copy 3 of raster 2 skull layer
Your placement should like image below

6. Edit/copy/copy merged
Take it to animation shop right click in workspace pastes as new animation
7. Back in Psp close Raster 2 skull layer by clicking eye
Open copy of raster 2 skull layer
Edit/copy/copy merged
Take it to animation shop right click first frame/paste/paste after current frame.
8. Back in Psp close copy Raster 2 skull layer by clicking eye
Open copy 2 of raster 2 skull layer
Edit/copy/copy merged
Take it to animation shop right click second frame/paste/paste after current frame.
9. Back in Psp close copy 2 of Raster 2 skull layer by clicking eye
Open copy 3 of raster 2 skull layer
Edit/copy/copy merged
Take it to animation shop right click third frame/paste/paste after current frame.
10. In Animation shop Edit/select all
Right click on frame one/select frame properties
Change display time to 30
Selections select none
11. Now select frame 4
Right click select frame properties
Change display time 90
Thanks for trying my tutorial I hope you enjoyed it.
Please remember if you use this for a Stat
To Place proper credit on it
Tutorial by Babs C
Here (link to website)
©Sassy n Simple
Please if you use it to make a stat apply below credit in your footer
Tutorial by: ©Sassy n Simple
HERE or HERE
You can copy and paste the above but if does not work links below
http://www.sassynsimple.com/
And to here http://groups.yahoo.com/group/sassynsimple/
Thanks to the members of
Sassy n Simple
for testing the tutorial for me