Web design Artwork by OUTLAW BY DESIGN


©Sassy n Simple
Date Written: Oct. 6, 2010
THINGS YOU NEED
Paintshop or Corel Program You will need a good working knowledge of the program.
It is your responsibility to have or find the programs needed for this tutorial.
TUBE: Of your choice I used Jose Cano PTU get it at MPT
I have a License
KIT: Laurie Made Me Scraps FTU Sunday Afternoon HERE
FONT: Of your Choice
MASK: SNS Mask_01_2010 HERE
ANIMATION SHOP
READ BELOW BEFORE STARTING
Settings may differ slightly depending on your version.
Close original after you copy it unless I state otherwise.
Sharpen all re-sized items 1 time.
RE-SIZE only one layer unless other wise stated.
Refer to my image for placement of items.
Left click and right click refers to mouse buttons.
NOW YOU CAN JUMP IN
1. Open your tube and My mask minimize for now
2. Open a new transparent image 500x500
Do not fill
3. Layers palette/right click raster 1/add a new raster layer
Selections/select all
Keep selected
4. Select pap15 from the kit Edit/copy
Edit/paste into selection
Selections select none
5. Layers/new mask layer/from image (settings below)
Make sure to select SNS Mask_02_2010 in the window
Click OK

6. Layers palette/right click black/white mask
Delete
Would you like this mask merged into layer below YES
Layers palette/right click top mask/ merge/merge group
7. Select 7.png frame from kit Edit/copy
Edit/paste as new layer into your image
Re-size it 85%
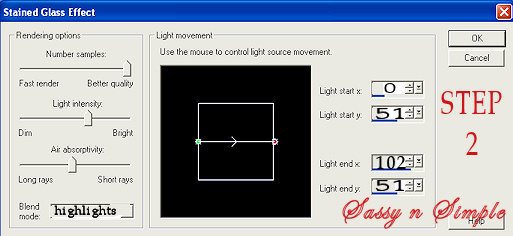
8. Effects/3D/drop shadow (settings below)
THINGS YOU NEED
Paintshop or Corel Program You will need a good working knowledge of the program.
It is your responsibility to have or find the programs needed for this tutorial.
TUBE: Of your choice I used Jose Cano PTU get it at MPT
I have a License
KIT: Laurie Made Me Scraps FTU Sunday Afternoon HERE
FONT: Of your Choice
MASK: SNS Mask_01_2010 HERE
ANIMATION SHOP
READ BELOW BEFORE STARTING
Settings may differ slightly depending on your version.
Close original after you copy it unless I state otherwise.
Sharpen all re-sized items 1 time.
RE-SIZE only one layer unless other wise stated.
Refer to my image for placement of items.
Left click and right click refers to mouse buttons.
NOW YOU CAN JUMP IN
1. Open your tube and My mask minimize for now
2. Open a new transparent image 500x500
Do not fill
3. Layers palette/right click raster 1/add a new raster layer
Selections/select all
Keep selected
4. Select pap15 from the kit Edit/copy
Edit/paste into selection
Selections select none
5. Layers/new mask layer/from image (settings below)
Make sure to select SNS Mask_02_2010 in the window
Click OK

6. Layers palette/right click black/white mask
Delete
Would you like this mask merged into layer below YES
Layers palette/right click top mask/ merge/merge group
7. Select 7.png frame from kit Edit/copy
Edit/paste as new layer into your image
Re-size it 85%
8. Effects/3D/drop shadow (settings below)

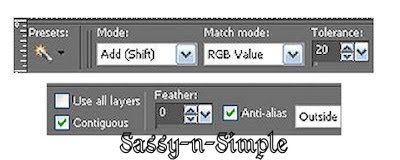
9. Select magic wand (settings below)
Click inside the frame window make sure
To click inside all areas between the branches at bottom
Keep selected
10. Layers palette/right click group raster 2/add a new raster layer
Select 14.png from the kit Edit/copy
Edit/paste into selection
Selections/select none
11. Select your Tube Edit/copy
Edit/paste as new layer into your image
Re-size as needed I re-sized 50%
Apply same drop shadow
12. Select 4.png flower branch from kit Edit/copy
Edit/paste as new layer into your image above group raster 2
Move it to top right corner above the frame
Re-size it 70%
Apply same drop shadow
Now adjust it back out from the frame
13. Still on flower branch
Layers palette/right click/duplicate 1 time
Image/mirror
right click duplicate/merge/merge down
14. Still on merged flower branch Layer
Layers palette/right click/duplicate 1 time
Image/flip
Right click duplicate/merge/merge down
To click inside all areas between the branches at bottom
Keep selected


10. Layers palette/right click group raster 2/add a new raster layer
Select 14.png from the kit Edit/copy
Edit/paste into selection
Selections/select none
11. Select your Tube Edit/copy
Edit/paste as new layer into your image
Re-size as needed I re-sized 50%
Apply same drop shadow
12. Select 4.png flower branch from kit Edit/copy
Edit/paste as new layer into your image above group raster 2
Move it to top right corner above the frame
Re-size it 70%
Apply same drop shadow
Now adjust it back out from the frame
13. Still on flower branch
Layers palette/right click/duplicate 1 time
Image/mirror
right click duplicate/merge/merge down
14. Still on merged flower branch Layer
Layers palette/right click/duplicate 1 time
Image/flip
Right click duplicate/merge/merge down
15. Select your text tool font and settings of your choice
(or use my settings below)
Adjust size using nodes
Layers/palette/right click/convert to raster layer
Place your saying or sayings where you want them.
Apply same drop shadow
16. Now apply artist copyrights and your watermark
Close the bottom raster 1 layer
right click any layer/merge/merge visible
Open your raster 1 layer back up
17. Under selections do the following
A. select all
B. select float
C. Select defloat.
D modify expand 3
Keep Selected
18. Select Pap2 from the kit Edit/copy
Edit/paste into selection on Raster 1 (bottom Layer)
Selections select none
19. Layers palette/right click/merge/merge visible
20. Select your magic wand same settings
Click on the inside center of all the flowers even little ones
And click on some of the balls not a lot of them.
You will need to zoom in so you can see to select the middle.
Keep Selected
21. Edit/copy
Layers palette right click/add a new raster layer
Edit/paste into selection
Selections select none.
22. Layers palette click eye to close off bottom layer
(make sure the top layer is selected)
Edit/copy
Continue to animation Part
(or use my settings below)
Adjust size using nodes
Layers/palette/right click/convert to raster layer
Place your saying or sayings where you want them.
Apply same drop shadow

16. Now apply artist copyrights and your watermark
Close the bottom raster 1 layer
right click any layer/merge/merge visible
Open your raster 1 layer back up
17. Under selections do the following
A. select all
B. select float
C. Select defloat.
D modify expand 3
Keep Selected
18. Select Pap2 from the kit Edit/copy
Edit/paste into selection on Raster 1 (bottom Layer)
Selections select none
19. Layers palette/right click/merge/merge visible
20. Select your magic wand same settings
Click on the inside center of all the flowers even little ones
And click on some of the balls not a lot of them.
You will need to zoom in so you can see to select the middle.
Keep Selected
21. Edit/copy
Layers palette right click/add a new raster layer
Edit/paste into selection
Selections select none.
22. Layers palette click eye to close off bottom layer
(make sure the top layer is selected)
Edit/copy
Continue to animation Part
ANIMATION
Open your animation shop now
1. Right click anywhere paste as new animation
2. Effects select Insert Image Effects
Follow settings below
Select frame 1Edit/select all
Move it over to one side to allow room to paste another animation

3. Go back to PSP close off the top layer by clicking the eye
Open up the bottom layer make sure to select it
Edit/copy
4. Take it to Animation shop
Right click anywhere paste as new animation
Right click the frame duplicate selected
Do this till you have a total of 4 frames
5. Click on frame 1 Edit/select all
Make this big enough so you can see clearly how
To place the balls and flowers animation into it.
6. Go to the first animation (balls and flowers) holding
left mouse button down
Drag it into your second animation
Image animation
Carefully line the balls up before releasing mouse
7. Should you mess up go to edit undo drag
Go to other animation edit undo drag
And then try to drag it again.
8. Once happy save your animation
I did not change my display times
Thanks for trying my tutorial I hope you enjoyed it.
Please if you use it to make a stat apply below credit in your footer
Tutorial by: ©Sassy n Simple
HERE or HERE
You can copy and paste into footer but if not links are below
http://www.sassynsimple.com/
And to here http://groups.yahoo.com/group/sassynsimple/
©Sassy n Simple
Open your animation shop now
1. Right click anywhere paste as new animation
2. Effects select Insert Image Effects
Follow settings below
Select frame 1Edit/select all
Move it over to one side to allow room to paste another animation


3. Go back to PSP close off the top layer by clicking the eye
Open up the bottom layer make sure to select it
Edit/copy
4. Take it to Animation shop
Right click anywhere paste as new animation
Right click the frame duplicate selected
Do this till you have a total of 4 frames
5. Click on frame 1 Edit/select all
Make this big enough so you can see clearly how
To place the balls and flowers animation into it.
6. Go to the first animation (balls and flowers) holding
left mouse button down
Drag it into your second animation
Image animation
Carefully line the balls up before releasing mouse
7. Should you mess up go to edit undo drag
Go to other animation edit undo drag
And then try to drag it again.
8. Once happy save your animation
I did not change my display times
Thanks for trying my tutorial I hope you enjoyed it.
Please if you use it to make a stat apply below credit in your footer
Tutorial by: ©Sassy n Simple
HERE or HERE
You can copy and paste into footer but if not links are below
http://www.sassynsimple.com/
And to here http://groups.yahoo.com/group/sassynsimple/
©Sassy n Simple